
# Configuring Airnode
Complete the following before configuring your Airnode.
 This icon links to additional field information in the reference section.
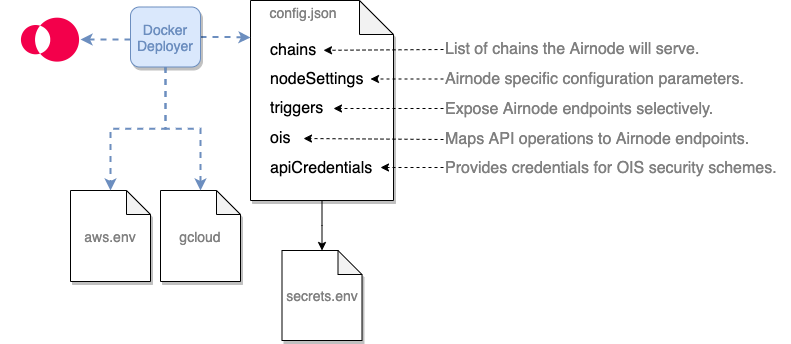
An Airnode is deployed or redeployed using configuration values from its
config.json and secrets.env files. The config.json specifies the
OIS (Oracle Integration
Specifications) and other specific configuration details. The secrets.env file
holds secrets, such as API keys and chain provider URLs, which are referenced
within the config.json file using interpolation.
The config.json file is used during the deployment/redeployment of an Airnode to configure its behavior and to provide mappings of API operations.
The secrets.env file holds values for config.json that must be kept secret.
The aws.env file holds AWS credentials for deployments targeted to AWS.
The user's local gcloud:/app/gcloud db holds gcloud credentials for deployments targeted to GCP cloud functions.
The following example files are useful while reading this doc.
# Creating config.json
Use the config.json template to
build your own Airnode configuration file or alter the
config.json example file. There
are five root level fields in config.json.
# chains
Each row in the chains array represents an Ethereum blockchain the Airnode
will serve as identified by the id. Currently Airnode only supports Ethereum
blockchains as denoted by type: "evm". There are several supported
blockchains, see them in the
Airnode contract addresses doc. You
can use multiple chain providers for each chain and declare multiple chains each
with one of more chain providers. See
Chains Providers in Concepts and
Definitions.
Below is a simple chain array with a single chain provider.
"chains": [
  {
    "authorizers": [
      "0x5Fgh48...3F6f64180acc"
    ],
    "contracts": {
      "AirnodeRrp": "0xF6d267546...BC9A384fa418"
    },
    "id": "4",
    "providers": [
      "infura_rinkeby": {
        "url": "${INFURA_RINKEBY_PROVIDER_URL}"
      }
    ],
    "type": "evm",
    "blockHistoryLimit": 300,
    "ignoreBlockedRequestsAfterBlocks": 20
  }
],
2
3
4
5
6
7
8
9
10
11
12
13
14
15
16
17
18
19
# authorizers
The list of authorizer contract addresses the Airnode deployment will set
on-chain. See the Authorization doc for
more information.
# contracts
Contains the addresses of the contracts that implement the Airnode protocols.
Although you can deploy these contracts yourself, you are recommended to use the
ones that were deployed by API3. You can find them in the list above.
# id
An Airnode can serve multiple chains simultaneously. Set the ID of the desired
chain in id (e.g., 4 for Rinkeby test network). See the list of supported
chains in the
Airnode Contract Addresses doc. See
additional definition in the
reference section.
# providers
Airnode can use multiple Ethereum providers per chain. These could be a private
Ethereum node, or an Ethereum service provider such as Infura. Accordingly, the
providers field is a list which allows for multiple Ethereum providers. Enter
a user defined name which identifies the provider and the provider URL which
usually is kept in the secrets.env file. The name is used in logs.
# type
The type of the chain. Only evm is supported at this time. See additional
definition in the
reference section.
# blockHistoryLimit
The number of blocks in the past that the Airnode deployment should search for
requests. Defaults to 300 (roughly 1 hour for Ethereum).
# ignoreBlockedRequestsAfterBlocks
The number of blocks that need to pass for the node to start ignoring blocked
requests. Defaults to 20.
# nodeSettings
The nodeSettings field holds node-specific (Airnode) configuration parameters.
{
"nodeSettings": {
    "cloudProvider": {
      "type": "aws",
      "region": "us-east-1"
    },
    "airnodeWalletMnemonic": "${AIRNODE_WALLET_MNEMONIC}",
    "heartbeat": {
      "enabled": true,
      "apiKey": "${HEARTBEAT_API_KEY}",
      "id": "${HEARTBEAT_ID}",
      "url": "${HEARTBEAT_URL}"
    },
    "httpGateway": {
      "enabled": true,
      "apiKey": "${HTTP_GATEWAY_API_KEY}"
    },
    "logFormat": "plain",
    "logLevel": "INFO",
    "nodeVersion": "0.3.1",
    "stage": "dev"
  },
2
3
4
5
6
7
8
9
10
11
12
13
14
15
16
17
18
19
20
21
22
# cloudProvider
Indicates which cloud provider Airnode should be deployed with and its
configuration. There are currently three options available: aws, gcp
(deployed using the docker deployer-image) and
local (deployed using the docker
client-image).
- type: Type of the cloud provider. Can be
aws,gcporlocal. - region: (AWS and GCP only) Refers to which region of the cloud provider
Airnode will be deployed at. An example value for AWS would be
us-east-1. When using GCP, use zone not a location (opens new window). Note that transferring a deployment from one region to the other is not trivial at this moment (i.e., it does not take one command like deployment, but rather three). Therefore, try to pick a region and stick to it for this specific deployment. - projectId: (GCP only) Project ID of the GCP project the Airnode will be deployed under.
# airnodeWalletMnemonic
An API provider provides a mnemonic to be used as the Airnode's BIP 44 wallet
from which the Airnode's address
will be derived. It is not required to fund the wallet to run the Airnode but
must be funded to announce the xpub of the
Airnode on-chain which is optional.
# heartbeat
At the end of each of Airnode's runs (every minute), Airnode can make an HTTP
POST request to a specified URL. This is both to signal that the Airnode is
alive and working (useful especially right after the deployment) and also to
send some metrics from its run. Turn on the heartbeat functionality by setting
all fields in the config.json section nodeSettings.heartbeat. See the
Heartbeat doc for more info.
- enabled: Enable/disable Airnode's heartbeat.
- url: The URL to make the heartbeat request to.
- apiKey: The API key to authenticate against the heartbeat URL.
- id: The Airnode heartbeat ID for accounting purposes.
# httpGateway
The gateway allows the testing of defined endpoints without accessing the
blockchain. See the HTTP Gateway doc for more info.
HTTP Gateway Support
As of this release HTTP Gateway is only supported for AWS Airnode deployments.
- enabled: Enable/disable Airnode's Access to the HTTP gateway
- apiKey: A user defined API key to authenticate against the gateway. The key must have a length of between 30 - 120 characters.
# logFormat
Set one of two possible log formats.
- json
- plain
# logLevel
Set one of four possible log levels.
- DEBUG
- INFO
- WARN
- ERROR
# nodeVersion
Of the form #.#.#, this field indicates which node (Airnode) version this
config.json is prepared for. Since the config.json format can be expected to
change with node versions, using a config.json prepared for one Airnode
version with another may result in unexpected issues. See the
Releases page of the Airnode repo (opens new window)
for available versions.
# stage
This field allows the deployment of multiple Airnodes with the same provider ID.
For example, the provider may deploy one Airnode with the stage api3 to serve
API3 dAPIs, and one with the stage public that serves the public. A regular
user will have a single deployment, so feel free to set any descriptive name as
your stage.
# triggers
The triggers field allows you to expose Airnode endpoints from an OIS
selectively. For example, your OIS may include ten endpoints, but you may only
want to serve two. Instead of modifying the OIS, you would simply create
triggers for the two. List the endpoints that you want to serve with the
request–response protocol under triggers.rrp. In most cases, you would create
a trigger for each endpoint in your OIS object.
# oisTitle & endpointName
Each trigger has an oisTitle and endpointName that allow you to refer to one
of the endpoints in an OIS object. Remember that an Airnode's config.json file
can have more than one OIS object. Fill these in accordingly.
# endpointId
Add an endpointId to the trigger which is the ID that a requester will use for
on-chain requests to reference a specific trigger. Use the admin CLI command
derive-endpoint-id
to derive endpoint IDs using the oisTitle and endpointName.
npx @api3/airnode-admin derive-endpoint-id \
  --oisTitle "My OIS title..." \
  --endpointName "My endpoint name..."
2
3
# ois
The ois field is a list OIS objects that Airnode will be serving. This means
that a single instance of an Airnode can serve multiple APIs. You can simply
copy paste OIS objects that you will be serving into the ois list. Use the
previous guide API Integration to create an OIS object.
# apiCredentials
Each entry in apiCredentials maps to a security scheme defined in an OIS
(ois[n].components.securitySchemes.{securitySchemeName} and
ois[n].security), where oisTitle is the title field of the related OIS,
and securitySchemeName is the name of the respective security scheme. These
would be myOisTitle and mySecurityScheme in the example below.
securitySchemeValue is the value used for the authentication with the security
scheme (e.g., the API key).
Use of apiCredentials is not required, leave its array empty if you don't need any security scheme.
// apiCredentials
[
  {
    "oisTitle": "myOisTitle",
    "securitySchemeName": "mySecurityScheme",
    "securitySchemeValue": "${SS_MY_API_KEY}"
  }
]
// From the OIS object apiCredentials is referencing
// using the oisTitle/securitySchemeName pair.
{
  "title": "myOisTitle",
  ...,
  "components": {
    "securitySchemes": {
      "mySecurityScheme": {
        "in": "header",
        "type": "apiKey",
        "name": "X-api-key"
      }
    }
  },
  "security":{
    "mySecurityScheme": []
  }
  ...
}
2
3
4
5
6
7
8
9
10
11
12
13
14
15
16
17
18
19
20
21
22
23
24
25
26
27
28
# oisTitle
The ois.title of the OIS where the securitySchemeName can be found.
# securitySchemeName
The name of a security scheme from
ois[n].components.securitySchemes.{securitySchemeName}.
# securitySchemeValue
The value of the security scheme used (as defined by
ois[n].components.securitySchemes.{securitySchemeName} for the authentication.
Usually stored in secrets.env.
Based on the setup above Airnode will call the API operation with the following header.
headers: {
  "X-api-key": "834989348HHGTDS_8754",
}
2
3
# Creating secrets.env
The secrets.env file contains values (secrets) such as blockchain provider
urls, chain provider urls, etc. These secrets are embedded in
config.json using
interpolation.
// Sample interpolation value from config.json
"httpGateway": {
  "enabled": true,
  "apiKey": "${HTTP_GATEWAY_API_KEY}"
},
// Sample variable in secrets.env
HTTP_GATEWAY_API_KEY="FRACZKMH4F32BZ8X5uTd"
2
3
4
5
6
7
8
Use the secrets.env template and refer to Reference > Deployment Files > secrets.env as needed.
# AWS setup (AWS deployment only)
# Creating aws.env (AWS only)
When it is time to deploy the Airnode to AWS, the Docker deployer image will need the AWS credentials to build the node on AWS Lambda.
Follow this video (opens new window) if needed. It
will show you how to create an IAM user and get security credentials. Put them
in the aws.env file as shown below. Note that double quotes (") are not
permitted to enclose the values as with the secrets.env file.
AWS_ACCESS_KEY_ID=XYZ...123
AWS_SECRET_ACCESS_KEY=ABC7...89
2
Here is an example file that is left blank.
# GCP setup (GCP deployment only)
# Creating a GCP project
First, you need to create a GCP project (opens new window) under which will the Airnode be deployed. Once the project is created, insert its project ID into your config.json.
# Enable required APIs
In order for Airnode to deploy successfully, you need to enable these APIs for your GCP project:
- CloudFunction API (opens new window)
- Cloud Build API (opens new window)
- Cloud Scheduler API (opens new window)
After enabling these, wait a few minutes before the deployment itself so the changes will take place.
# Obtain credentials
The easiest way to obtain GCP credentials is via Google Cloud SDK (opens new window). Once installed, run the following command to retrieve your Application Default Credentials (opens new window):
gcloud auth application-default login --project <PROJECT ID>
where <PROJECT ID> is your project ID.
# Summary
In this guide you created the config.json, secrets.env and obtained cloud
provider credentials required to deploy an Airnode to a cloud provider. Note
that config.json is user-specific and therefore it is not much use to others.
The secrets.envand aws.env files contains keys, chain provider urls and
security credentials, so they should be kept secret. Make sure that you do not
push your credentials (secrets.env and aws.env) to a repository or otherwise
expose them as these credentials can be used to gain access to your Airnode's
private key and AWS account.
The next three steps in this guide are optional.
- Applying Authorization optional
- Heartbeat optional
- HTTP Gateway optional